How to Install a Reverse Osmosis Water Filtration System

Reverse osmosis water filtration systems are one of the best solutions when it comes to getting clean water in your home. They have numerous benefits over other options such as carbon filters and ultraviolet setups used to disinfect water. In most households, these units are installed underneath the sink to provide only drinking water due to their supreme inefficiency (as they use about 70% of the water filtered by them is discarded). However, you can also use a reverse osmosis filtration system to provide clean water in the entire house. In this article, we will guide you through the process of reverse osmosis system installation in California.
Installing a Reverse Osmosis Filter
If you want to carry out reverse osmosis installation in California, you will first need to ensure that the cabinet underneath your sink has enough space for the filter. You will also need to figure out what type of cold water source you will be using, as filter kits come with different types of connections.
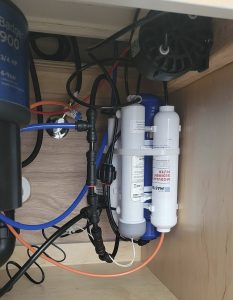
Once you have your Home Master reverse osmosis installation kit, you will need to install the sink-top spigot first. To do this, you will need to use an existing spigot opening in your sink or cut a new hole. Next, you will need to put the tank in its intended spot and attach the spigot connected to the tank nipple using some plumber’s tape. Once that’s done, figure out where you are going to put hanger washers on the wall and mark those locations. Attach the hanger washers and put the filter assembly in place.
Next, you will need to shut off your water and attach the green water pipe that came in the kit to your home’s water line. You should also connect the rest of the tubes according to the kit instructions, as these can vary between different types of filtration setups. Next, you will need to connect your filter to the drain using a drain tee. The drain tube of the filter should feed directly into the adapter tee.
Once the installation has been carried out, you should switch the water supply back on and turn on cold water to remove extra air from the pipes. Allow the reverse osmosis filtration system to pressurize for about 2 hours and ensure that there are no leaks. Turn on the filter spigot and let it purge for at least 24 hours before starting to use the water from the filter.
Tools and materials needed for the job
- Water filtration kit.
- Pipe-seal tape for plumbing.
- Tape measure.
- Screwdrivers.
- Level.
- Adjustable wrench.
- Hacksaw.
- Channel-lock pliers.
Why Reverse Osmosis Installation is Best Left to the Professionals
No matter how much experience you have with home projects, reverse osmosis water filter installation in California is best left to professionals. They have all the necessary training, knowledge, and skills to carry out the job as quickly as possible. Plus, there is no doubt that a professional will carry out reverse osmosis installation near me or reverse osmosis water filter replacement correctly. However, if you do the job yourself, you may make mistakes and damage your plumbing, filtration kit, or even cause a leak. Plus, you will likely need to purchase expensive materials and tools just to complete the job and spend many hours trying to make sense of all the piping. It’s a much better idea to have a professional carry out the installation of reverse osmosis in California for you.
If you’re looking for quality reverse osmosis repair in the Bay Area, don’t hesitate to call United Plumbing & water heaters, the best plumbers in San Jose.
Post views: 1060

